Forehand · High and low balls
Shoulder-high forehand coming: back up or step in?
Waiting for a high ball to drop takes a third of a second, and the ball keeps travelling the whole time. Where it landed tells you whether to wait.
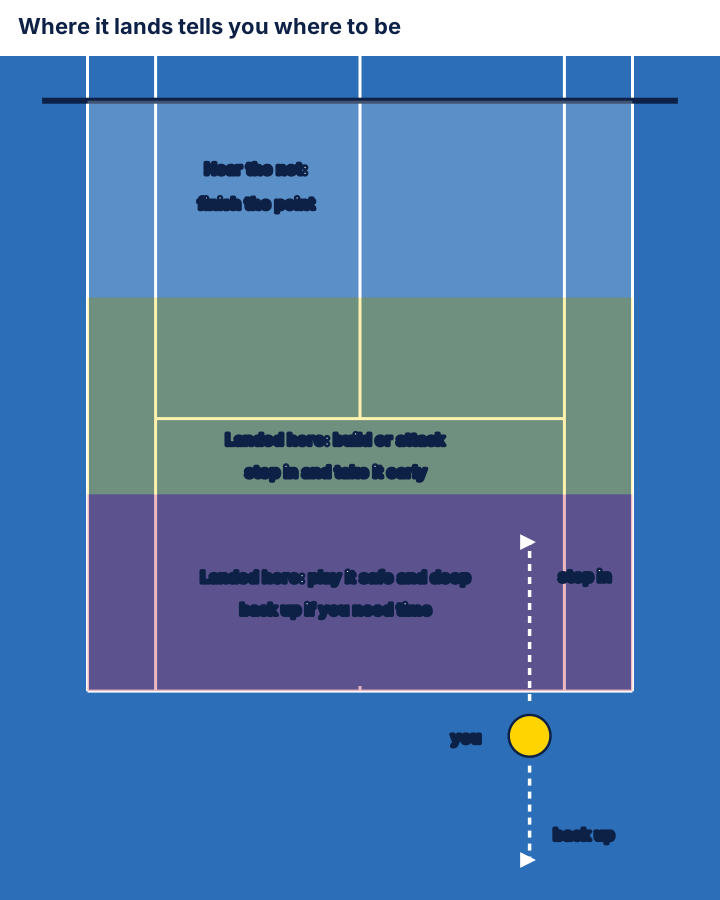
Figure 1. Where the ball lands decides how much you can attack it. The footwork labels are our reading of the zones.
What does “let it drop” really cost?
A heavy crosscourt forehand lands deep and kicks up to your shoulder. Instinct says: back up and let it come down.
Do the sum. Say the ball tops out 1.5 m up and you’d rather hit it at 1.0 m, the waist-high strike zone Championship Tennis recommends.1 A ball falling from rest needs 0.32 s to drop half a metre (our calculation, ignoring air drag). In that third of a second a ball travelling at 50 km/h, our assumption, moves 4.4 m. To meet it at waist height you must stand 4.4 m further back.
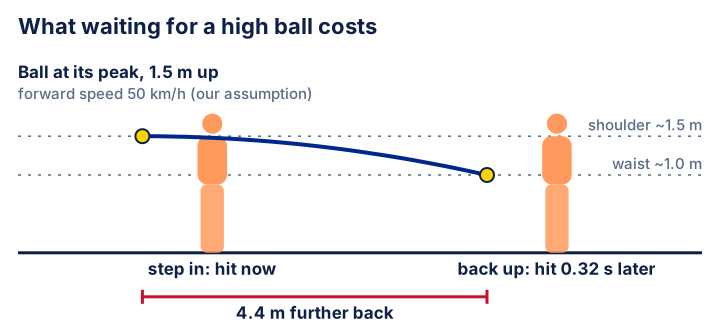
Figure 2. Stepping in hits the ball 0.32 s earlier. Waiting puts you 4.4 m back.
Four metres is a lot of court to hand over. From 3 m behind the baseline, Championship Tennis says to clear the net by 2.4 to 3.0 m, against 0.9 to 1.5 m from the baseline.1 In Tennis Australia’s scheme, behind the baseline is where defending starts.2
So should you always step in?
Where did it land?
Not how high it got. Championship Tennis splits your half into three even zones, about 4 m deep each, by where the ball lands.1 That is about shot choice, not feet, but your feet can follow:
- Landed near your baseline: play it safe and deep, and resist the urge to attack.1 Give yourself time: back up and hit high and deep, which is Tennis Australia’s advice when you’re out of position.2
- Landed in the middle zone: build or attack.1 Step in and take it early. You lose the waist-high contact, but you take 0.32 s from your opponent, and inside the baseline you are on offence.2
Three ways the high ball beats you
- Backing up, then hitting flat. From behind the baseline, a flat ball clearing the net by a metre is not what the numbers ask for.1
- Attacking from deep. A ball that landed by your baseline is the one Championship Tennis says mature players don’t attack.1
- Choosing at the peak. It’s too late to move by then. Decide when the ball lands.
Try it this week: call the zone
- A partner feeds high, heavy balls to your forehand while you start on the baseline.
- Call “deep” or “middle” the moment the ball lands.
- Deep: back up and send it high and deep. Middle: step in and take it early, aiming a metre inside the lines.2
- Ten balls, then swap.
How we got the numbers
Zones and net-clearance heights are from Championship Tennis.1 The drop time is free fall, the square root of 2 × 0.5 ÷ 9.81, which is 0.32 s, ignoring air drag. The heights (1.5 m and 1.0 m) and the 50 km/h forward speed are our assumptions; every extra 10 km/h adds about 0.9 m. Treat the result as a guide.
References
-
Frank Giampaolo and Jon Levey, “Reduce your errors on the court by examining zones,” excerpt from Championship Tennis, Human Kinetics. Waist-level strike zone, net-clearance heights by court position (0.9-1.5 m from the baseline, 2.4-3.0 m from 3 m behind it), and the three court zones. https://us.humankinetics.com/blogs/excerpt/reduce-your-errors-on-the-court-by-examining-zones ↩ ↩2 ↩3 ↩4 ↩5 ↩6 ↩7 ↩8
-
Tennis Australia, “Technical Fundamentals” (Coach Development, 2013), Tactical Fundamentals: defensive behind the baseline, offensive inside it; “safe spots” (high and deep when taken out of court); safelines a metre inside the lines. https://www.tennis.com.au/wp-content/uploads/2014/11/Technical-and-Tactical-fundamentals-guidelines_low-res.pdf ↩ ↩2 ↩3 ↩4